H5P is a javascript-based framework that is used to enhance the learners’ experience with interactive learning technology. It allows the creators to use interactive learning tools such as multiple choices, quizzes, true or false, and etc. on their education platforms like BrightSpace, BlackBoard, Canvas, and many others.
The below is an example interactive learning tool I have designed for an art class.
Using H5P
Using H5P was quite straightforward for me. I have so many experiences of using interactive learning tools in my educational sessions. However, it was new for me to design one from the teaching perspective, there was a lot to consider and a lot of new technology to absorb.
One thing I noticed is that while the simple interactive design methods are simple, the complicated methods require more software familiarity from the users. If I were to use a simple method such as true and false where I would enter the question and mark whether it’s the correct answer or not, the system design was simple and easy. However, when I tried to use the feature like drag and drop, or connecting objects, my lack of experience in using this software became a barrier to me trying to use it. I think it would have been nice if there were some sort of simple instructions on where to put the text and how to create a field to drop, etcetera.
On the other hand, I liked how good the result turned out to be in comparison to how much effort I had to put in (in terms of designing the format, not the content), I think it would have looked much nicer if I had prior experience working with H5P.
Especially since my topic covered a lot of arts and different artists, I think using an interactive learning design can help the learners differentiate which art was done by whom by doing a true/false and multiple choice. It would have caused confusion if it was just a text post.
Last thing I really liked about this tool is that it had the default required feature where if you input an image, you have to put a descriptive text for it so it can play the text-to-speech feature if the learner wanted.
Since this would be done on the online platform, I automatically assumed the learners would not need the visibility feature, but having that required descriptive text reminded me that some people might need assistance, I appreciated how the H5P was being considerate of assisting people of a minority.
The attached document is a learning plan I have designed for the H5P I made.
Along with the fast innovation of technology, AI technology has progressed a lot further than people have expected it to progress. The basic ideas started in the 1950, but it actually became very popular in late 2010, and I believe it’s still rapidly increasing, especially after the introduction of ChatGPT, Grammarly, and other AI media that people could easily access.
SOUNDRAW
I have tried ChatGPT before to get some ideas on my research paper topics before. I had rough ideas, but I couldn’t connect them together and I remember ChatGPT being a big help in putting my clustered ideas together.
So I wanted to try something new, and I got interested if there were generative sound AI’s. So I explored a few areas and found a generative AI called Soundraw.
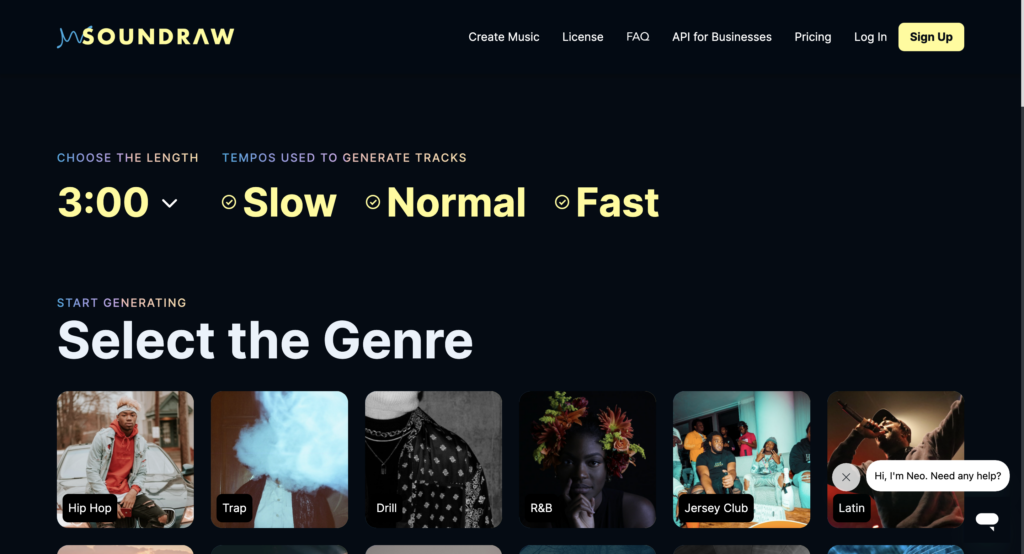
It first made me choose the length, tempo and genre of the music I was looking for.
I think it was trying to get a rough idea of what I wanted, I went with 3:00 minute and deselected slow, and selected a pop genre.
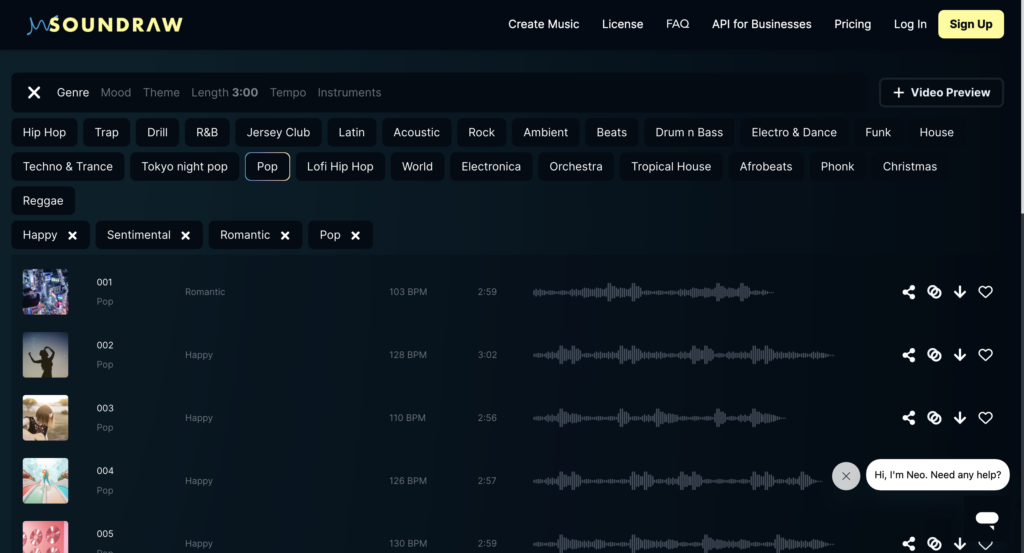
After, it led me straight into a page where it displayed multiple music right away.
I could edit the length, tempo, and genre I selected in the beginning, and I could add even more descriptive ideas to it, such as selecting lovely, happy mood, and even themes. I would try listening to it, edit the volume mixer, and skip to parts I wanted to skip to, add to favourites, share, block, download, and else.
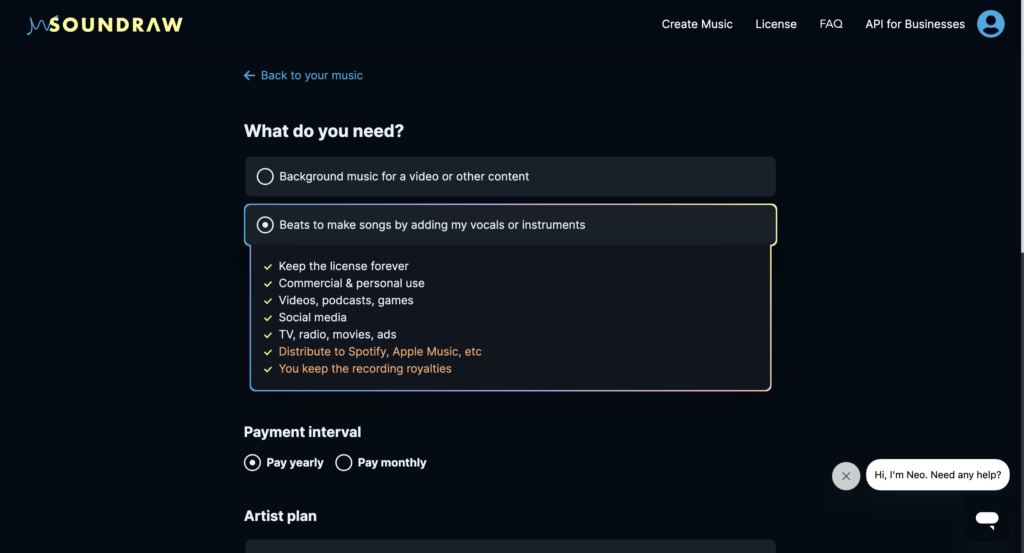
I was obviously restricted from doing some activities, which is enabled after paying for membership, and downloading the generated audio was one of them. However, while I was exploring what I can do for free, I noticed that in the membership, it allows you to keep the license forever, as well as distribution to popular music streaming platforms such as Spotify and Apple music. And the “owner” gets to take all recording royalties.
This is where it made me question the ethical considerations on the generative AI.
There are many ethical considerations of generative AI. Data usage, privacy, biased results, decision making, and others. In this post, I want to talk about ethical considerations in art.
Unlike the text-to-speech generative AI, other art-type generative AI such as AI generated pictures, videos, and sounds could have copyright considerations. The generative AI is known to learn from the input data – which often includes human work. And in an area where copyright is very important, such as artwork, music, and such, AI can generate things so easily very fast based on things it learned from – a human’s work without consent. Consuming on generative AI that learned from other people’s work without the artists’ consent is now creating art that at faster speed, as the user wanted without question, and even for free. And for some generative AI, like Soundraw I have showed above, they even grant the license to the buyer and gives them the right to distribute on public platforms, with the royalties.
An AI that learned from media without the artists consent, creating similar artwork, and granting the license to the user who only input the command line. If this is not resolved, the art industry will soon run out of real-people business. I don’t think this should be allowed. Not only it steals the data from the creditted artist, it also makes the people in the industry to have less jobs because some customers would not commision them anymore, which directly connects to their social determinants of health. Same goes for sound generative AI too. It will learn from many songs that people created, and produce sound in less than a minute, and if you only pay $30, you can take its full license.
Is it really right for the buyer to take the credit? When the AI learned based off many real-people’s work?
Students: The audience of this blog post is for people who are interested in hand-knitting basics. I introduced how to make a foundation chain (aka starting chain), how to create foundation loops, and how to add rows on top of them, as well as how to finish them. There are many patterns in knitting and my video would be great for the starters before they take on the complicated patterns.
Ease of use: As my video was designed for the beginners, it will not require any skills or training. It will only need the material which people would already have by the time they would search up the video or consider buying.
Cost: The only cost of my video would be the yarn they will be using for their own project. Because the video does not really produce one set material for a certain project, the cost really depends on how big of a project the audience wants to do. If they would like to make a simple lap blanket, just one big yarn would be fine which would usually cost about $10-$20, but if they want to make a full sized blanket, they would cost about 12 yarns or more which would easily go over $100.
Teaching: I feel like what I have showed was a good content. However, it could definitely get way better. Because I didn’t have a place I can comfortably record, I was stuck on my desk with a desk camera. If I was able to move the angles up closer easily, with smoother lighting, it would have helped the audience so much better, especially because if you’re only just starting to learn how to knit, it can be really confusing since there are many, many, many hooks.
Interaction: Since my content was more like a “watch and follow” learning, I wouldn’t say it was a passive-learning interaction. Rather, I would say it was an active interaction for the audience and the material of my media, as it is most likely to make them craft it on-hands.
Organizational issues: There would be no maintenance my content will require as long as YouTube allows me to keep it posted. It does not use any form of software other than its published platform, does not involve any method that could cause me an onganizational issues.
Networking: I’m not sure if I can broaden the network using the medium I created as it is very specific to knitting. However, it will be a lot easier if the course setting was in a small group of people, such as 2 to 20 people in one long table, so the instructor can walk around and help people as it involves complicated handworks. For people who were not able to make it, they can watch the video and learn, but if they ever have questions, they might struggle until they need to watch other videos or meet the instructor in-person again.
Security and privacy: The video can be watched alone, and could be shared online. Because it is posted based off the university-approved website, it would be confident to say it is secured and safe to use.
I remember when I was a child, I read a book about ballerinas. I believe it started with a picture of beautiful people on the stage, starting with the grow-up story of one of the most popular ballerinas in the world. When I turned the page over, it showed me the feet of the people in the ballet industry. Then I remember the book saying something like “you may see a swan floating on the water with grace, but when you look at them closely, they are paddling madly underwater”. Starting off with showing a pretty side of a real person who was well-known in the industry then moving to the things they had to work very hard on, and lastly leaving a related message felt highly impactful when I read it. When I was going through the materials for this week, this memory that I had forgotten until now just popped up on top of my head, I thought learning by storytelling is quite effective and impactful.
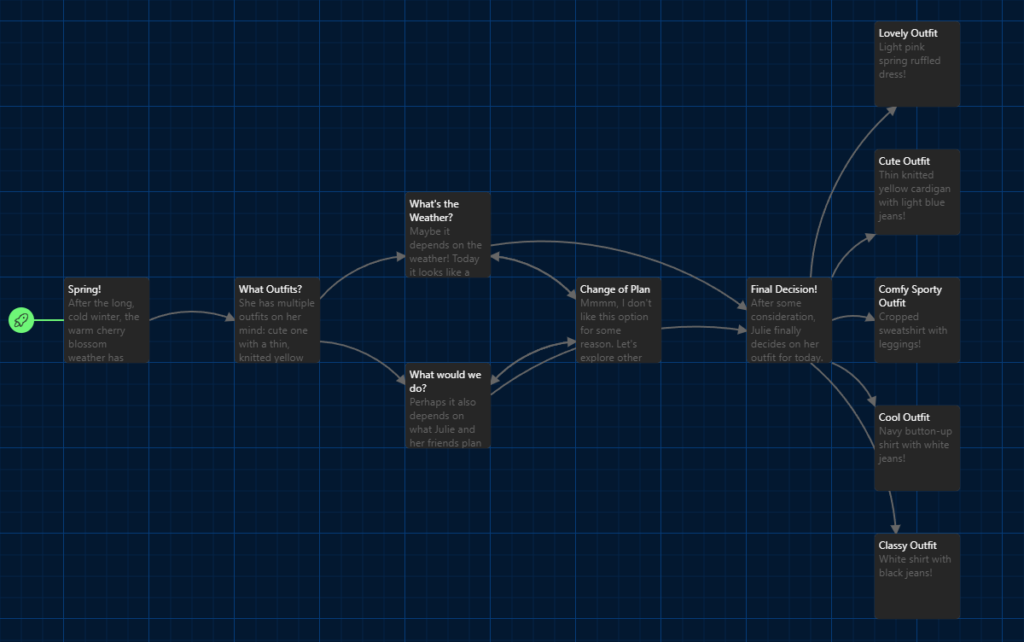
Using Twine
A sample story made using Twine.
It seems that Twine features a technique where it allows the learners to be actively involved by allowing the creator to make a story and a few selections based on the learner’s input. This would help them pay more attention as it requires a follow-up action to learn. However, the process of creating a story from the creator’s perspective was not the best. Also, if the creator is not familiar with HTML or CSS, it seemed like there would be a limited design of the result from what I’ve experienced.
It doesn’t open up with some useful shortcuts, and it doesn’t show the creator how to connect from story to story easily unless the user actively searches up for it. I also did not like how the text boxes kept opening on top of each other, the transition design seemed smooth but putting them on top of each other felt really overwhelming and unnecessary. I also wish it had arrows in different colours so the creator can easily tell which process will go to what follow up process story.
Overall, learning with Twine would be helpful for the learners as it allows the learners to be actively participating in order for it to run. However, the learners could also feel bored easily if most of its content is going to be text without any special animated effects, video, images, and such. And most of these features would be able to be used if the creator is somewhat familiar with CSS and HTML. From the creator’s perspective of who might use this website, there were many areas of improvement that could be worked on. At this rate, it might be better to have a Google slide where if you press an area, it navigates you to someplace.
The learning purpose of my video is to show how to create a knit project using only thick yarns and hands. Possible projects could include a blanket, seating cushion, small padding, and many more.
Why is Video a Good Medium for this Learning Purpose?
Often, beginners or inexperienced learners find it hard to learn by only reading the knitting patterns or a written post – because knitting requires a lot of handwork and proper work.
As shown in the example, it can be challenging for some people to understand the knitting pattern. So I thought the video would be a great learning tool for the struggling audience.
Which of the principles we’ve covered this term did you incorporate into your design and why?
While making this video, I had Cognitive Theory in my mind. I made sure to put only the necessary caption for each part of the video to help viewers understand/focus better on each part and follow the steps easily.
As I was speaking a detailed explanation in the video, I put down simple, but clear captions in each part so the viewers could see and hear my explanations while watching the visual representation of each step in knitting.
As for the limited capacity principle, I knew that there were multiple ways of doing each step, such as creating the first knot or how to finish off the knit. However, I chose the method that seemed most simple to me and went with that instead of showing two or more different ways of doing the steps, so the audience can focus better and learn.
What was challenging about capturing the video?
Since I was knitting with my own hands, they kept covering the pattern I was trying to show. I thought the audience might find it to be hard to see for certain parts and I think changing the angle of the camera might have helped, as well as the colour of the yarn I was using – maybe more of a vivid colour? Editing the video was also quite challenging as it was my first time not only recording but also editing a video. Keeping my hands and the knitting in the camera was also challenging because I kept unconsciously trying to move out of the camera to find a “comfortable” angle for myself when I knit. I also found talking while doing something with my hands to be somewhat struggling for myself as well.
What did you find easiest?
I personally found it easiest to create a storyboard. I could imagine how I would make the video since I knew well about the topic, even though the video didn’t go as well as planned. I think it would have been much easier if it was done on a pad instead of a computer so I could draw things on the visualization side rather than screenshotting the parts to it after filming the video (as other pictures on the internet I could use before recording my own are all someone else’s work).
How would you approach capturing video differently next time?
I might change the angle of the camera so the audience has an easier time to watch it. If I had more time and help, I might even capture the zoomed-in pictures/parts of the video so it could also help as well.
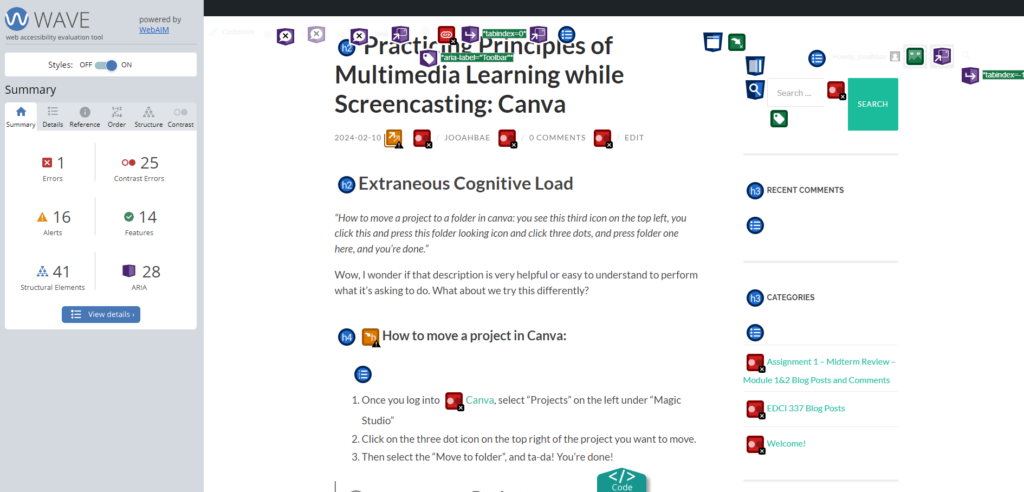
The very first thing I noticed after running the WAVE assessment is that even though it’s to mark all places that have errors, context errors, structures, etcetera, it looks very messy, it was a little confusing to figure out what was happening.
Once I got used to using this tool, I unchecked the areas where it had features, structural elements, and ARIA, and this is what it looked like.
I was surprised it had a lot fewer errors than expected from the first messy, confusing screen. Did not think the default colour of the site directories and button being light green with the white font was going to be a colour contrast error so that part was interesting. After realizing this, I thought maybe some people with visible impairment might have trouble reading the context in these colour mix.
Possible Improvements
I like how the WAVE assessment shows people a room for improvement on their page. However, limiting the default showing icons to only errors and alerts would be a nice start until the user selects further options – it could help with the user getting clearer views of things and not as fatigued as the current default option. Otherwise, I liked how it helped me realize the colour mix that I thought was cute might be troublesome to some who are visibly impaired.
Infographic with Canva
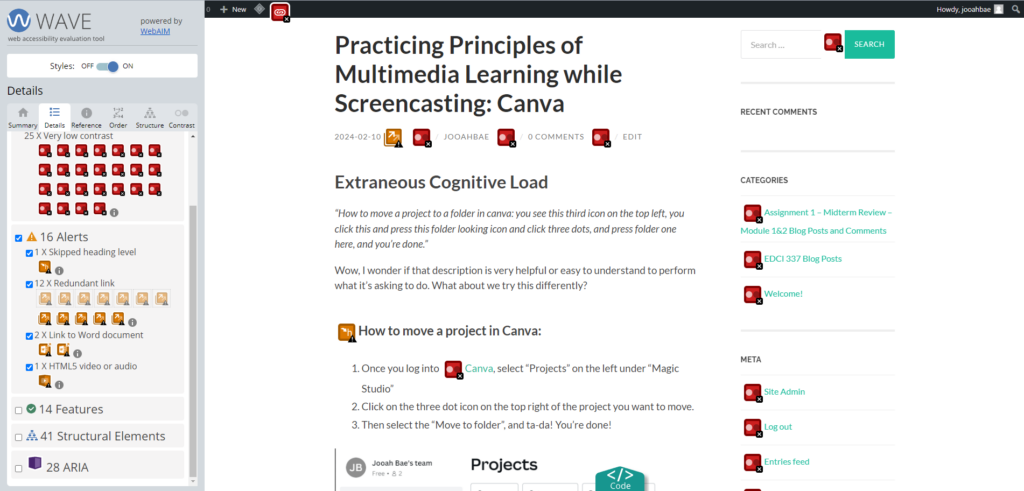
While I was reading the contents in Module 2, I found this one article that was about using subtitles and showing results between deaf/hard of hearing people and hearing people with and without subtitles. As a deaf person who prefers to have subtitles on most of the things I watch, I got interested and decided to make an infographic out of this article.
Reading Infographic for Visibly Impaired People
Although I have never used the text-to-speech tool as I’m deaf and I prefer to read than hear sounds, I believe this option would be great for those who are visibly impaired. The use of text-to-speech assistant technology such as screen readers would help them attain information from infographics that are very visual-heavy. Avoiding the use of small texts or colours that many colour-blind people can’t see is another way of making infographics disability-friendly.
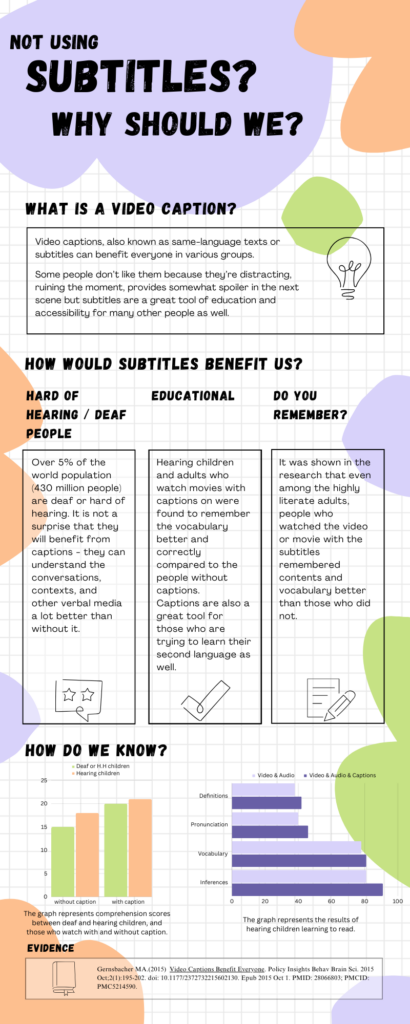
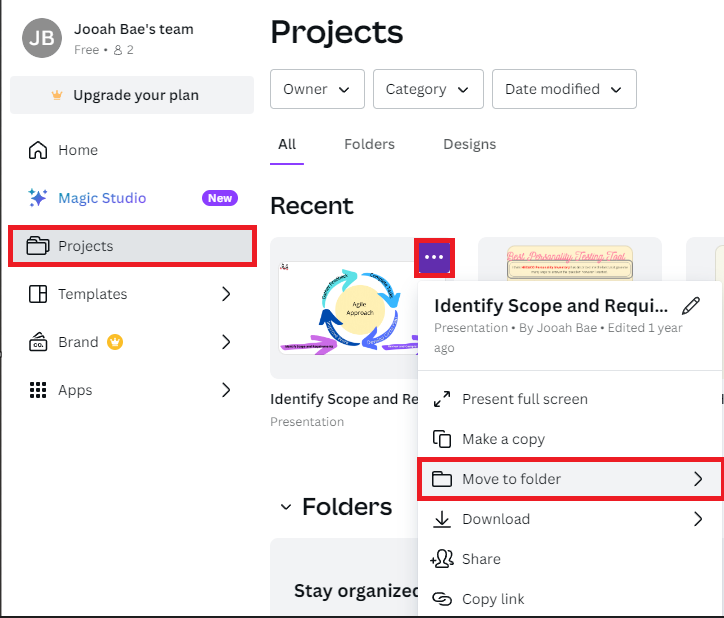
“How to move a project to a folder in canva: you see this third icon on the top left, you click this and press this folder looking icon and click three dots, and press folder one here, and you’re done.”
Wow, I wonder if that description is very helpful or easy to understand to perform what it’s asking to do. What about we try this differently?
How to move a project in Canva:
Once you log into Canva, select “Projects” on the left under “Magic Studio”
Click on the three dot icon on the top right of the project you want to move.
Then select the “Move to folder”, and ta-da! You’re done!
Only two principles of extraneous cognitive load were added (Signaling principle, Contiguity principle) to the plain instruction and things are looking a lot easier to learn.
What’s on my mind?
While I was screencasting with Zoom on Canva, I was trying to keep the principle of coherence from extraneous cognitive load in my mind. I get sidetracked quite often, and since the purpose of the screencast is to inform and provide information/instruction on using media, I tried to focus on staying on track. To provide better learning results to people, it is suggested to eliminate all unnecessary information and stay focused on the topic. However, presenting is not one of my biggest strengths, so my screencast video might have a rough time trying to keep this principle in mind.
Who needs this screencast?
Canva is an online free design tool that can create graphics such as social media posts, presentations, posters, infographics, and more. To this day, this site is loved by many students and organizations as it creates great infographics easily at no cost (and more magical features to come once you upgrade to different plans!).
I created this screencast of Canva in hopes that this can help those people who will be using Canva for the first time. I will be going through how to create a simple infographic using multiple shapes, colours, elements, pictures, and other tools.
Below is my screencast using Zoom on Canva:
Photo by Flickr user jfchenier under CC license: BY-NC 2.0
Before proceeding with this first blog post, we expect you to consider your privacy preferences carefully and that you have considered the following options:
Do you want to be online vs. offline?
Do you want to use your name (or part thereof) vs. a pseudonym (e.g., West Coast Teacher)?
Do you want to have your blog public vs. private? (Note, you can set individual blog posts private or password protected or have an entire blog set to private)
Have you considered whether you are posting within or outside of Canada? This blog on opened.ca is hosted within Canada. That said, any public blog posts can have its content aggregated/curated onto social networks outside of Canada.
First tasks you might explore with your new blog:
Go into its admin panel found by adding /wp-admin at the end of your blog’s URL
Add new category or tags to organize your blog posts – found under “Posts” (but do not remove the pre-existing categories or sub-categories). If you would like to add more course categories, please do so (e.g., add EDCI 306A with no space for Music Ed, etc.)
See if your blog posts are appearing on the course website (you must have the course categories assigned to a post first and have provided your instructor with your blog URL)
Add pages
Embed images or set featured images and embed video in blog posts and pages (can be your own media or that found on the internet, but consider free or creative commons licensed works)
Under Appearance,
Select your preferred website theme and customize to your preferences (New title, etc.)
Customize menus & navigation
Use widgets to customize blog content and features
Delete this starter post (or switch it to draft status if you want to keep for reference)
Do consider creating categories for each course that you take should you wish to document your learning (or from professional learning activities outside of formal courses). Keep note, however, that you may wish to use the course topic as the category as opposed to the course number as those outside of your program would not be familiar with the number (e.g., we use “Multimedia Learning” instead of “edci337).
Lastly, as always, be aware of the FIPPA as it relates to privacy and share only those names/images that you have consent to use or are otherwise public figures. When in doubt, ask us.
Recent Comments